Author: kevin

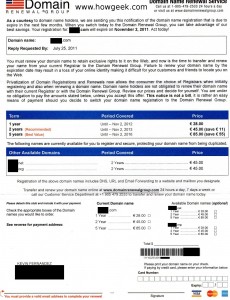
  • The domainrenewal (domainrenewalgroup.com) scam

    OK this is already everywhere on internet for years, but i really had to write a post about it as these guys are spamming my mailbox every year.

    This company is trying to convince people into believing they need to renew (and obviously transfer) their domain names with them. Their paper looks very professional, and they are still active, which means they might be making some good money.

    Here’s the envelop (click to see better):

    And the letter:


    Also their website is www.domainrenewalgroup.com (no way i hard-link this s***), and their former name was “Domain Registry of America”.


  • $_SERVER[‘HTTP_X_FORWARDED_FOR’] returns multiple IPs, what to do?

    Before reading this article, you should know that HTTP_X_FORWARDED_FOR should only be used for websites behind a proxy, otherwise you should use REMOTE_ADDR!! This article talks about getting the right visitor IP through HTTP_X_FORWARDED_FOR for applications behind a reverse proxy!

    You might have faced it as it’s not so well documented. Note that i’m using nginx as reverse proxy, and this may not be the case with all the servers.

    Yes HTTP_X_FORWARDED_FOR might return multiple IPs. And i’ve read multiple bogus statements on internet saying the first IP is the right one. This is incorrect.

    The first IP may be the real client behind many proxies, but it can be fake (modified through headers).

    So what is correct is to get the LAST IP from the list of IPs, which is the IP that connected to your (reverse) proxy, this is what you probably need in 99% of cases, trust me.

    Here is the code in PHP:

    $ip_array=explode(“,”, $_SERVER[‘HTTP_X_FORWARDED_FOR’]);

    $remoteip=trim($ip_array[count($ip_array)-1]);

  • Apache PROXYPASS, NEGATIVE PROXYPASS AND AUTH_BASIC

    Today i had to face a weird problem with Apache 2. I wanted to setup a webmail on the SAME virtualhost that i was using to proxy to another host.
    Here’s a summary of my configuration:

    <VirtualHost *:80>

    ServerAdmin sysadmin@localhost

    DocumentRoot /var/www/folder

    ServerName localhost

    Alias /mail /var/lib/roundcube/
    <Directory /var/lib/roundcube/>

    Options Indexes Includes FollowSymLinks

    AllowOverride All

    AuthType Basic

    AuthUserFile /var/lib/roundcube/.htpasswd

    AuthName “Protected Folder”

    require valid-user

    </Directory>
    ProxyRequests Off

    ProxyPreserveHost On
    <Proxy *>

    Order deny,allow

    Allow from all

    </Proxy>
    ProxyPass /mail/ !

    ProxyPass / http://0.0.0.0/ ttl=60 retry=0 status=I keepalive=on timeout=2500 disablereuse=on
    </VirtualHost>

    The problem is that the auth_basic wasn’t working correctly in this setup, Apache was answering with a 200 instead of a 401 message, which prevented the browser from understanding it was actually an authentication..

    But this config was working fine without the auth, the webmail was working. And it was working fine with auth but no proxypass.
    So what was wrong?! Thanks to the guys @freenode i discovered that Apache was proxying the requests to custom errors in /error/ (as i uncommented the custom errors in apache2.conf). The solution was to add:

    ProxyPass /error/ !

    Turn loglevel to debug in case you have a similar issue, in my case i could read this:

    [Fri Mar 04 15:44:36 2011] [debug] mod_proxy_http.c(56): proxy: HTTP: canonicalising URL //10.10.10.10/error/HTTP_UNAUTHORIZED.html.var
    [Fri Mar 04 15:44:36 2011] [debug] proxy_util.c(1506): [client 1.1.1.1] proxy: http: found worker http://10.10.10.10/ for http://10.10.10.10/error/HTTP_UNAUTHORIZED.html.var

    Hope it helps.

  • Dailymotion Videowall WordPress Widget Plugin

    I had to create a plugin for WPMU to allow users to add a Dailymotion Videowall in the sidebar.

    It is available at this page: http://wordpress.org/extend/plugins/dailymotion-videowall-widget/

    Stay tuned for a multi-language version!

    Here’s the link if you want to donate:


  • MySQL: Restore a dropped database

    NOTE BEFORE TRYING ANYTHING DO A BACKUP OF ALL DATABASES. 1 MISTAKE CAN BE A BIG PROBLEM, IMAGINE 2 MISTAKES AT THE SAME TIME!!

    You need bin logs for this tutorial, if you didn’t have them enabled, then you have to look somewhere else..

    Today i accidentally “dropped” the database of a site i host thanks to my lazyness and the use and the brilliant and intuitive software called phpmyadmin, which i usually NEVER use.

    What i did is a simple drop database mysite;

    I had a backup from may 21 at 07:40 (check carefully the filetime of your last backup).

    Then i went to /var/log/mysql/

    Did ls -la to check the time of the logs:

    -rw-rw—-  1 mysql adm   66005373 mai 21 06:25 mysql-bin.001036
    -rw-rw—-  1 mysql adm   38683086 mai 22 06:25 mysql-bin.001037
    -rw-rw—-  1 mysql adm   48038277 mai 23 06:25 mysql-bin.001038
    -rw-rw—-  1 mysql adm   40780613 mai 24 06:25 mysql-bin.001039
    -rw-rw—-  1 mysql adm   42856471 mai 25 06:25 mysql-bin.001040
    -rw-rw—-  1 mysql adm   48990369 mai 26 06:25 mysql-bin.001041
    -rw-rw—-  1 mysql adm   54580611 mai 27 06:25 mysql-bin.001042
    -rw-rw—-  1 mysql adm   49505245 mai 28 06:25 mysql-bin.001043
    -rw-rw—-  1 mysql adm   57696248 mai 29 06:25 mysql-bin.001044
    As i knew i deleted the database on may 29 near 18:10, i ran this command:
    mysqlbinlog –start-datetime=”2010-05-21 07:40:00″ –stop-datetime=”2010-05-29 18:05:00″ -d mysite mysql-bin.0010* > /tmp/replay.sql
    Then i recreated my dropped database:
    create database mysite;
    Put the old backup:
    mysql -umysite -pmysite mysite < mysite.sql
    And applied the replay sql right after:
    mysql -umysite -pmysite mysite < /tmp/replay.sql
    And everything came back magically! Hope it helps!
  • Daemon Tools error: Unable to validate the installation

    If you got that error “unable to validate the installation” or “Setup is unable to validate installation” when reinstalling Daemon Tools, and you’re unable to either uninstall/reinstall/run Daemon Tools, do the following:

    1) Remove completely the Daemon Tools folder manually, it’s usually C:\Program Files\Daemon Tools

    2) Then reinstall Daemon Tools with the installer.

    There’s no 3) unless you want to remove Daemon Tools at this point 🙂

  • ffmpeg-php – error: ‘PIX_FMT_RGBA32’ undeclared (first use in this function)

    /tmp/ffmpeg-php-0.6.0/ffmpeg_frame.c: In function ‘zim_ffmpeg_frame_toGDImage’:
    /tmp/ffmpeg-php-0.6.0/ffmpeg_frame.c:336: error: ‘PIX_FMT_RGBA32’ undeclared (first use in this function)
    /tmp/ffmpeg-php-0.6.0/ffmpeg_frame.c:336: error: (Each undeclared identifier is reported only once
    /tmp/ffmpeg-php-0.6.0/ffmpeg_frame.c:336: error: for each function it appears in.)
    /tmp/ffmpeg-php-0.6.0/ffmpeg_frame.c: In function ‘zim_ffmpeg_frame_ffmpeg_frame’:
    /tmp/ffmpeg-php-0.6.0/ffmpeg_frame.c:421: error: ‘PIX_FMT_RGBA32’ undeclared (first use in this function)
    make: *** [ffmpeg_frame.lo] Erreur 1

    To fix this, replace PIX_FMT_RGBA32 with PIX_FMT_RGB32 . You can use “rpl” to replace files recursively:

    cd to the ffmpeg folder and run this command (beware!):

    rpl -R PIX_FMT_RGBA32 PIX_FMT_RGB32 *

  • Bind on FreeBSD 7.2 error: named[1531]: the working directory is not writable

    To fix this error, edit the following file:

    /etc/mtree/BIND.chroot.dist

    Change:

    /set type=dir uname=root gname=wheel mode=0755

    into:

    /set type=dir uname=bind gname=wheel mode=0755

    Then restart bind:

    /etc/rc.d/named restart

  • Interstate 76′ D3D patch + Gold Patch + Force Feedback Patch

    I upload here the patches i have of Interstate 76′ as they are difficult to find.

    Interstate 76′ Force Feedback Patch (might be deprecated)

    Interstate 76′ Patch 1081 + French changelog (deprecated, see the one under)

    Interstate 76′ Patch 1083

    Interstate 76′ Gold Patch

  • Compiling Micropolis (Simcity) on Ubuntu Intrepid (8.10) and Jaunty (9.04)

    Update: Starting from Ubuntu Karmic (9.10), Micropolis is in your apt!

    You need the following:

    sudo apt-get install libx11-dev libxpm-dev x11proto-xext-dev libxext-dev

    You also need yacc, it will fail if you use bison or btyacc:

    btyaccpa.ske:111: erreur: expected specifier-qualifier-list before ‘yyparsestate’
    btyaccpa.ske:128: erreur: expected ‘=’, ‘,’, ‘;’, ‘asm’ or ‘__attribute__’ before ‘*’ token
    btyaccpa.ske:131: erreur: expected ‘=’, ‘,’, ‘;’, ‘asm’ or ‘__attribute__’ before ‘*’ token
    btyaccpa.ske:180: erreur: expected ‘)’ before ‘*’ token
    btyaccpa.ske:181: erreur: expected ‘=’, ‘,’, ‘;’, ‘asm’ or ‘__attribute__’ before ‘*’ token
    btyaccpa.ske:182: erreur: expected ‘)’ before ‘*’ token
    btyaccpa.ske: In function ‘yyparse’:
    btyaccpa.ske:193: erreur: ‘yyparsestate’ undeclared (first use in this function)
    btyaccpa.ske:193: erreur: (Each undeclared identifier is reported only once
    btyaccpa.ske:193: erreur: for each function it appears in.)
    btyaccpa.ske:193: erreur: ‘yyerrctx’ undeclared (first use in this function)
    btyaccpa.ske:206: erreur: ‘yyps’ undeclared (first use in this function)
    btyaccpa.ske:257: erreur: ‘yypath’ undeclared (first use in this function)

    Or:

    tclxgdat.y:67.15: syntax error, unexpected =
    tclxgdat.y:79.16: syntax error, unexpected =
    tclxgdat.y:83.25: syntax error, unexpected =
    tclxgdat.y:86.32-33: valeur $ invalide : $3

    But works with byacc:

    sudo apt-get install byacc

    Get the micropolis source (micropolis-activity-source.tgz) from http://www.donhopkins.com/home/micropolis/ , extract it:

    tar -zxvf micropolis-activity-source.tgz

    cd micropolis-activity/

    Then apply this patch and compile:

    wget http://rmdir.de/~michael/micropolis_git.patch

    patch -p1 < micropolis_git.patch

    cd src

    make clean (if you tried compiling with another yacc before)

    make install

    If you get the following error then when doing ./Micropolis:

    sh: Syntax error: Bad fd number
    sh: Syntax error: Bad fd number

    Do:

    sudo apt-get install rpl

    go inside the micropolis-activity folder and run:

    rpl -R “/bin/sh” “/bin/bash” *

    And recompile Micropolis:

    cd src

    make clean install

    Enjoy Micropolis! 🙂